I can’t seem to get silk screen pin numbers to show up on NANO and MEGA 2560. Is there any instructions on how to make them visible in PCB view?
↧
How to show silk screen numbers on nano and mega?
↧
How to build my IC (4-bit counter SN7475)?
First of all, sorry if this question has already been asked, I am a new user of the application and new to digital electronics altogether.
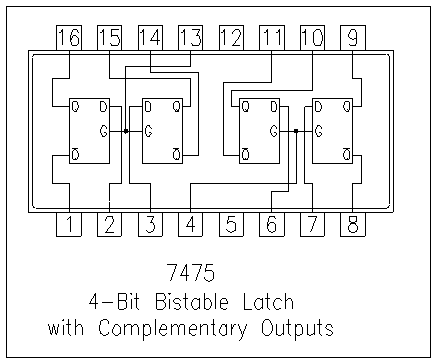
I am supposed to make a 4-bit counter using SN7475, to count up/down when pushing a button. http://circuits.datasheetdir.com/105/SN7475-pinout.jpg
And I do not know where to start. How to make the D latches for the connections? Any tips would be great. Thanks guys.
↧
↧
How to show silk screen numbers on nano and mega?
It appears (as usual) that the parts in core don’t have lettering on the silkscreen. The theory is that if you want the lettering you can add it to the part manually in your sketch. Otherwise you (or more likely one of us) would have to make a custom part.
Peter
↧
How to build my IC (4-bit counter SN7475)?
You need to create a fritzing part for the 7475 because there doesn’t seem to be one available (there was one at some point but the github page no longer exists.) Changing the labels in a generic IC is probably the easiest course for that. I expect that process is covered in the tutorials here:
Peter
↧
Conception de 2 circuits imprimés avec capteurs à effet hall , et une carte arduino , pour un accordéon
Your 2 pictures don’t appear in the post (I suspect because the files were missing an extension such as .jpg or .png for image files). Getting the pictures visible is the first step.
Peter
(via google translate):
Vos 2 images n’apparaissent pas dans le message (je suppose que les fichiers manquaient d’une extension telle que .jpg ou .png pour les fichiers image). Obtenir les images visibles est la première étape.
↧
↧
How to build my IC (4-bit counter SN7475)?
I know that I have to create a part, and setting the pins and changing the label names was the only thing that I managed to do.
Implementing the logic behind is hard. In order for my board to work, I have to make 4 D-latches and connect them like in this picture, and the Q’s are the bits of the counter.
My problem is how to make the D-latches, and I can’t get over this step.
↧
How to build my IC (4-bit counter SN7475)?
I think perhaps your expectations of Fritzing are too high :-). It only produces the schematic and pcb, it doesn’t do simulation so it doesn’t need (unless you want it for the schematic) the internals of the part. It doesn’t care what the part does, only what connections it has to other parts. So as long as you have the pin names on the box you can connect power supplies, resistors and switches to the pins to make your circuit. The idea is that you then build it physically on a real breadboard and do the testing there.
Peter
↧
How to build my IC (4-bit counter SN7475)?
Hi Peter!
Thanks a lot for your insight. I have solved the problem now
↧
Would love some help/feedback
I think I’m starting to get this! 
My only question (and I’ll leave you alone after this) is why have both the logic and motor ground connected to the Barrel Jack ground? That’s 12v input, so shouldn’t the logic ground come from the 5v Capacitor ground?
It’s so much easier on a breadboard when you have different power and ground rails! Haha. I never really thought about the ground and power too much in a more permanent situation. It’s confusing!
↧
↧
Would love some help/feedback
The barrel jack is the initial source of ground, any point of ground that isn’t on the high current path (and thus subject to voltage drop) would do, the trick is to make sure the source of ground for the logic is somewhere that isn’t subject to a voltage drop due to high current. While we like to think of ground being ground and all the same, when dealing with high current and resistance in wire or traces, that isn’t correct. In this case this may be over kill, but better to have overkill than logic that only works most of the time. No need to limit your questions, I have time, and other people learn by reading this as well since it applies in lots of cases.
Peter
↧
How to show silk screen numbers on nano and mega?
What’s going on, I told the guy in the other post what to do.
↧
How to show silk screen numbers on nano and mega?
You said “It’s too hard for a beginner to get the labels back because they are hidden in the svg.” Which doesn’t really answer the question. If there is another revised board for nano also then perhaps that would work but I don’t know how many parts in fritzing have the labels hidden so it would be nice to know how to fix this as it didn’t do this to me before in previous installations of fritzing. Is there any walkthrough on how to do it?
↧
How to show silk screen numbers on nano and mega?
I linked the MEGA with the labels, but I don’t know about the Nano, and if the text is actually there just hidden.
If you know how to work with vector svgs you go in and make them show, and then reassign all the pins again in FZ if they don’t auto assign. Or if you know how to code in XML you might be able to do it.
↧
↧
I2C OLED display faster with ESP8266 than with Arduino nano?
Maybe because ESP8266 runs at 80mhz vs Arduino at 16mhz ??
↧
How to show silk screen numbers on nano and mega?
Learned something new again. Looks like they have hidden the text in the mega in a layer so Fritzing doesn’t display it (don’t off the top of my head know how to cause that to display, I suspect move it to layer1). The nano doesn’t have the text as far as I can see (looking at the svg).
Peter
↧
Fritzing.0.9.3b.64.pc just hangs on Windows 10
Thank you a lot @bcraigie! Your linked git.exe file was the key to a successfull installation on windows 10. Beforehand Fritzing crashed all the time in both 32 and 64 bit versions. Then I just downloaded the git.exe that you linked and copied it into the fritzing folder. Now Fritzing started correctly, made some updates and runs flawlessly. Thanks a lot! That is a major issue for all new installations, because newbies will turn away from this great project as they dont know what to do. And it can be fixed quite easy. Maybe someone from the developer team should look into this.
↧
How to show silk screen numbers on nano and mega?
I made it show in my linked part, but I don’t remember how because it was so long ago. All I know is I had to assign the 55 pins in FZ about 5 times, and that was 275 assignments too many. 
↧
↧
How to show silk screen numbers on nano and mega?
OK, that motivated me to figure out how to fix this. Changing layers may work, but I don’t know how to do that, so I used brute force instead.
In Fritzing right click on the mega rev3 part and click “edit with new parts editor”, then file->save as new part. From the mine parts bin, export the new part as an fzpz file (right click the part and export part). Unzip the fzpz file and with Inkscape edit the svg.xxxx_pcb.svg file. In xml editor click on “silkscreen” group and shift-cntrl-g multiple time til silkscreen is entirely ungrouped. Edit select all and group. In xml editor step down to the copper1 group and unindent the group (to change it out of the new silkscreen group and back in to root). Set the new group’s id to silkscreen and save the file as plain svg. Rezip the file in to an fzpz file and load it in Fritzing and the silksceen lettering is there. It may be easier to use a text editor and search the file for “text” (I usually use grep in cygwin on windows to do this) to see if there is any hidden text, or edit the svg with a text editor and search for text to see if there is any hidden text to see if the first method is worth trying.
Peter
↧
Conception de 2 circuits imprimés avec capteurs à effet hall , et une carte arduino , pour un accordéon
Bonjour , toutes mes excuses pour les fichiers . Je crois que c’est bon maintenant ? Voici quelques photos , le schéma de tom scarff, le circuit de ma rampe de la main gauche que j’ai réalisé avec l’ensemble des capteurs à effet hall l , ils sont tous organisés suivant un même schéma de principe ci-joint. La difficulté c’est aussi de limiter les fils de liaison à l’intérieur , il faudrait donc compléter le circuit imprimé par un composant qui matrice les capteurs suivant la logique arduino . Je dispose de l’ide de la programmation de ma carte arduino réalisée par Tom Scarff . Merci pour votre aide .
midi_harmoneon_LH_RH_switches|597x500[sch%C3%A9ma%20de%20principe%20de%20ma%20rampe%20d’effets%20hall|687x500]
↧
Conception de 2 circuits imprimés avec capteurs à effet hall , et une carte arduino , pour un accordéon

↧